Getting Prepared Month 2: First Aid, Personal Hygiene and Home Safety
 |
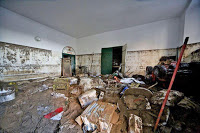
Photo credit Rick Steves “Cinque Terre Disaster” |
Gaye Levy, Contributing Writer
Activist Post
A couple of months ago I presented a calendar for family preparedness. In 12 Months of Prepping, One Month at a Time, I laid out month by month tasks and was able to breakdown the overwhelming chore of preparing for an emergency in manageable and affordable chunks. Today, I explore Month #2 in greater detail.
But first, let me step back and remind you of one of the most easily justifiable reasons why you should prepared: unpredictable weather. Storms. tornadoes, hurricanes, floods and other wonky weather patterns can disrupt you, your home and your life in a heartbeat. Take a look at the picture above taken after the October 25th storm and floods that hit Italy’s Cinque Terre and you will get my point.
You don’t have to be a conspiracy theorist, a political dissenter or even a dissatisfied and disillusioned citizen to know that the forces of mother nature will – at one time or another – require you to tuck in and rely on your own resources to get by. If you are lucky, you will only need to get by for a few days but alas, the aftermath of some weather systems may require you to fend for yourself for a week or longer.
And so, in this month-by-month preparedness series, review your existing preparations and make sure these basics are covered. And if you are just beginning to prep, breathe a sigh of relief.
The tasks in any one month will not be too difficult nor too expensive and, at the end of twelve months, you and your family will be prepared.
Are you ready to get started with Month #2 preps?
MONTH 2 SUPPLIES & GEAR:
- Canned vegetables – 4 per person
- Toilet paper – 3 rolls per person
- Sanitary napkins – 2 months’ supply
- Instant drinks (coffee, tea, powdered soft drinks)
- Family sized first aid kit
Last month we started our food storage with canned meats and prepared foods. This month we add the variety and increased nutrition that comes from canned veggies. There is only one rule of thumb here: only purchase and only store veggies that you enjoy and veggies that you will actually eat. Hate spinach? Notwithstanding that spinach greens are a powerful superfood, if you or your family don’t like it, don’t store it. Storage space is too precious to waste.
In addition to veggies, we are adding some instant beverages to our food stores. Pick your poison: instant coffee, herbal or flavored teas, hot chocolate or, a personal favorite, a few bottles of wine or even some whiskey or rum. Okay, so the wine and whiskey are not technically instant, but they require no special preparation so I am including them here for use at your own discretion.
Don’t forget the kiddos. Kool-Aid, tang or some of the powerhouse drink powders especially geared for the young ones are a must – just make sure that you also store away a bit of sugar if needed when reconstituting the final product. Something else to keep in mind is that a spoonful of one of these instant drink mixes can make otherwise “off-tasting” stored water more palatable.
Now here’s the rub. Colleagues of mine will carefully package and store food, water, ammo, family communication plans, flashlights, batteries and all sorts of gear. But ask if they have some tissues to blow there nose or to, well, maintain hygiene after taking care of business, I will be given a blank stare.
If you do nothing else this month, pack away toilet paper, sanitary supplies for the ladies, Kleenex, deodorant, toothpaste, floss and a toothbrush for each member of your family. And while you are at it, a wash cloth or two and a bar of soap will be much welcomed additions to your gear bag. Oh, and also some condoms if you are so inclined.
Counter Markets Newsletter - Trends & Strategies for Maximum Freedom
#mc_embed_signup {clear:left; font:14px Helvetica,Arial,sans-serif; text-align: center; padding-bottom: 15px; }
.cmhead{color: rgb(255,199,27); text-shadow: 1px 1px 3px rgba(0,0,0,0.5); text-align: center; font-size: 250%; font-family: sans-serif; font-weight: 700;}
.cmsubhead{color: rgb(255,255,255); text-align: center; font-size: 150%; font-family: sans-serif;}
.cmformhead{color: rgb(30, 29, 29); font-size: 160%; font-family: sans-serif; margin-bottom: 10px;}
#mc_embed_signup form { display: inline-block; background-color: #FFF; background-color: #FFF; margin-top: 20px; border-color: rgb(31, 31, 31);
outline: none;
background-color: rgb(255, 255, 255);
opacity: 1;
border-width: 3px;
border-style: solid;
border-radius: 5px;
width:70%;
}
#mc_embed_signup input.email {width: 90%; }
#mc_embed_signup input.button { width: 93%; background-color: rgb(246, 137, 34); border-bottom: 3px solid rgba(0,0,0,0.2); font-size: 160%;}
#mc_embed_signup .button:hover {background-color: #e67409;}
/* Add your own MailChimp form style overrides in your site stylesheet or in this style block.
We recommend moving this block and the preceding CSS link to the HEAD of your HTML file. */
When putting together a first aid kit, you can purchase and all-in-one kit, set it aside and you are good to go. That is the easy way to go, and options start at a very reasonable $25 all the way up to $100, $200 and more. If you decide to go this route, check out the reasonably priced Adventure First Aid Kit 2.0 (about $20) or the more comprehensive Adventure Medical Kits Weekender Kit (about $75).
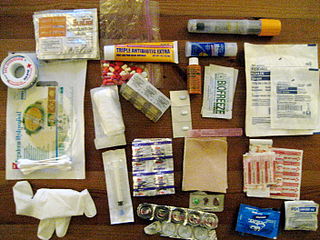
Another option – and this is what I did – was to pull together the first aid supplies yourself, adapting to the needs of your family, their age, and the types of calamities that are likely to occur in your particular area.

Here is my list along with a use for each of the items:
- Alcohol: Disinfecting, cleaning wounds. Alcohol wipes are also good, but you run the risk of opening the little packet and finding that it is dry as a bone.
- Bandages: Preferably waterproof in a variety of sizes including extra large for big scrapes.
- Ace bandages: Sprains
- Vaseline: One of my favorite frugal but effective remedies. Chapped lips, cracked skin, overall extra duty moisturizer
- Neosporin or other Antibiotic Ointment: For killing bacteria and soothing cuts. Note: antibiotic ointments have a shelf life and should be replaced annually.
- Cortisone cream: Rashes, skin irritations, itching.
- Acetaminophen & ibuprofen: Aches, pains, fever.
- Benadryl (oral) or generic equivalent: Oral antihistamine for allergies and allergic reactions.
- Antibiotics: My doctor recommends Cipro as the very best all-purpose antibiotic. It is very cheap, but effective for a wide variety of ailments.
- Imodium or other anti-diarrheal: Ummm, I think you know what this is for. Can also be used on your dog.
- Tweezers: Removing splinters.
- Nail Clippers: Lots of uses including split nails, hangnails, clipping dead skin.
- Tums or other Antacid: Indigestion.
- Cough Syrup: Cold remedy.
- Digital Thermometer: This will let you know when it is time to call for medical help.
- First Aid Book: Not crucial, but a nice addition for those times when you simply do not know what to do.
Keep in mind that this is not a comprehensive, trauma-oriented kit that might be required in the case of a huge natural disaster. Instead, these are the items that will be useful if I am required to be cooped up in isolation for a week or two — or while vacationing, camping. traveling, or simply waiting out the latest winter storm.
- Change the batteries and test your smoke detectors. Purchase and install smoke detectors if you don’t have them.
- Make an inventory of home contents for insurance purposes. Take photographs (digital are easiest) of your house and contents. Store a copy away from your home.
Smoke detectors are not set it and forget it. Like all pieces of survival gear, they need to be tested. This means getting out a ladder and pushing the test button to make sure it is working properly. It also means changing the batteries annually.
Ask yourself if you have an adequate number of smoke detectors. One should be placed on every level of your home, with the most important location being near the bedrooms. Better yet, place a smoke alarm inside every bedroom, as well your kitchen and any room with a fireplace or wood stove. Also, did you know that virtually every recognized fire authority recommends the installation of both ionization and photoelectric alarms in order to maximize protection from either flaming or smoldering fires?
And while you are at it, check your Carbon Monoxide detectors and replace their batteries as well. Carbon Monoxide is a colorless, odorless gas that is produced when any fuel is incompletely burned. Sadly, about 150 people die each year from non-fire, carbon monoxide poisoning associated with home fuel-burning heating equipment. This is preventable with a $30 detector.
The last task this month will be to walk around your home and inventory the contents for insurance purposes. Grab your digital camera and take lots of photos. Almost every digital camera these days also has video function, so a quick pan around each room will help substantiate not only what you own, but also the quality of your furnishing, fixtures and cabinetry. Store the photos and video on a flash drive and you will be way ahead of the curve if disaster strikes and you need to file an insurance claim.
Being prepared has gone mainstream. I recently saw a newsletter published by a local assisted living facility, and there it was: prepping tips for seniors living in a sheltered, highly supervised assisted living facility. I also saw where our local drugstore was stocking all-in-one 72-hour kits.
This is a welcome breath of fresh air. No longer viewed as the purview of wannabe Rambo’s and Nut Jobs, survivalists have now been gentrified and are called preppers. Personally? I don’t care who or what they are called. The important thing is to get ready and be ready. And doing so one month at a time makes it easy!
Getting Prepared Month 1: Supplies, Gear, and Tasks
Gaye Levy, the SurvivalWoman, grew up and attended school in the Greater Seattle area. After spending many years as an executive in the software industry, she started a specialized accounting practice offering contract CFO work to emerging high tech and service industries. She has now abandoned city life and moved to a serenely beautiful rural area on an island in NW Washington State. She lives and teaches the principles of a sustainable, self-reliant and stylish lifestyle through emergency preparation and disaster planning through her website at BackdoorSurvival.com. SurvivalWoman speaks her mind and delivers her message with optimism and grace, regardless of mayhem swirling around us. Enjoy your next adventure through common sense and thoughtful preparation!
var linkwithin_site_id = 557381;
linkwithin_text=’Related Articles:’


